Friday, 3 October 2014

Spotfire Text Area - Dynamic HTML content with DropDownListColumn

Been using Spotfire a lot and wanted to share interesting bits. I needed a table that allowed a user to change a value in a row and save this back to the database. This required a DropDownListColumn, which currently doens't exist in Spotire - so I wrote one. On a button click event, I used IronPython to generate dynamic JQuery and HTML elements to build the functionality/ The data table concerned is looped through in Python and the relevant HTML tags are concatenated into a large string. The column concerned with the DropDownList just has one declared. When the value in the dropdownlist is changed, a JQuery event is fired that saves it back to a hidden textbox, along with the primary key field, separated by a colon. Once the save button is clicked a JQuery event is raised that loops through the textboxes and save the data into a comma separated array. This array is converted to a String and placed inside a Spotfire Document Control property. Using JQuery commands of Focus and Blur imitates the user going into the textbox, triggering Spotfire to change the Document Property to the value in the Property Control element. We can then use a Python script event attached to the Document Property to decode the Array and save the data back to the database. Pretty long winded, but it so far it seems to work really well. The code below is the Python that generates the HTML and JQuery
#Variables:

#dataTable (Table containing rows to loop through - this is the source that I wish to add a dropdownlist column to)

#page - page which contains the TextArea

#visTA - text area we are going to drop the HTML into


dataTable.Refresh()

#get list of filtered rows
rows = Document.ActiveFilteringSelectionReference.GetSelection(dataTable).AsIndexSet()

#generate Javascript function
html = " \n"


#generate html table
#generate html head
html += " \n"
html += " \n"
html += "  \n"
html += " "

#generate html header
for column in dataTable.Columns:
	html += ""
html += " \n"
html += "\n"

counter = 1
achievedOrig = 0
childPlanner = ""
#generate html rows
html += " \n"
for r in rows:
	html += " "
	for column in dataTable.Columns:
		if column.Name == "FutureMod":	
			achievedOrig = column.RowValues.GetFormattedValue(r)
		if column.Name == "ChildPlanner":
			childPlanner = column.RowValues.GetFormattedValue(r)
		html += ""
	html += " "
	html += ""
	html += " \n"

	counter  = counter + 1
#finish html
html += " \n"
html += " 
" + column.Name + "Achieved
" + column.RowValues.GetFormattedValue(r) + "\n" html += "
\n" #show results from Spotfire.Dxp.Application.Visuals import TablePlot, HtmlTextArea ta = visTA.As[HtmlTextArea]() originalHtml = ta.HtmlContent endOriginal = originalHtml.find("") endOriginal = endOriginal + 10 ta.HtmlContent = originalHtml[0:endOriginal] + html print html Document.ActivePageReference = page


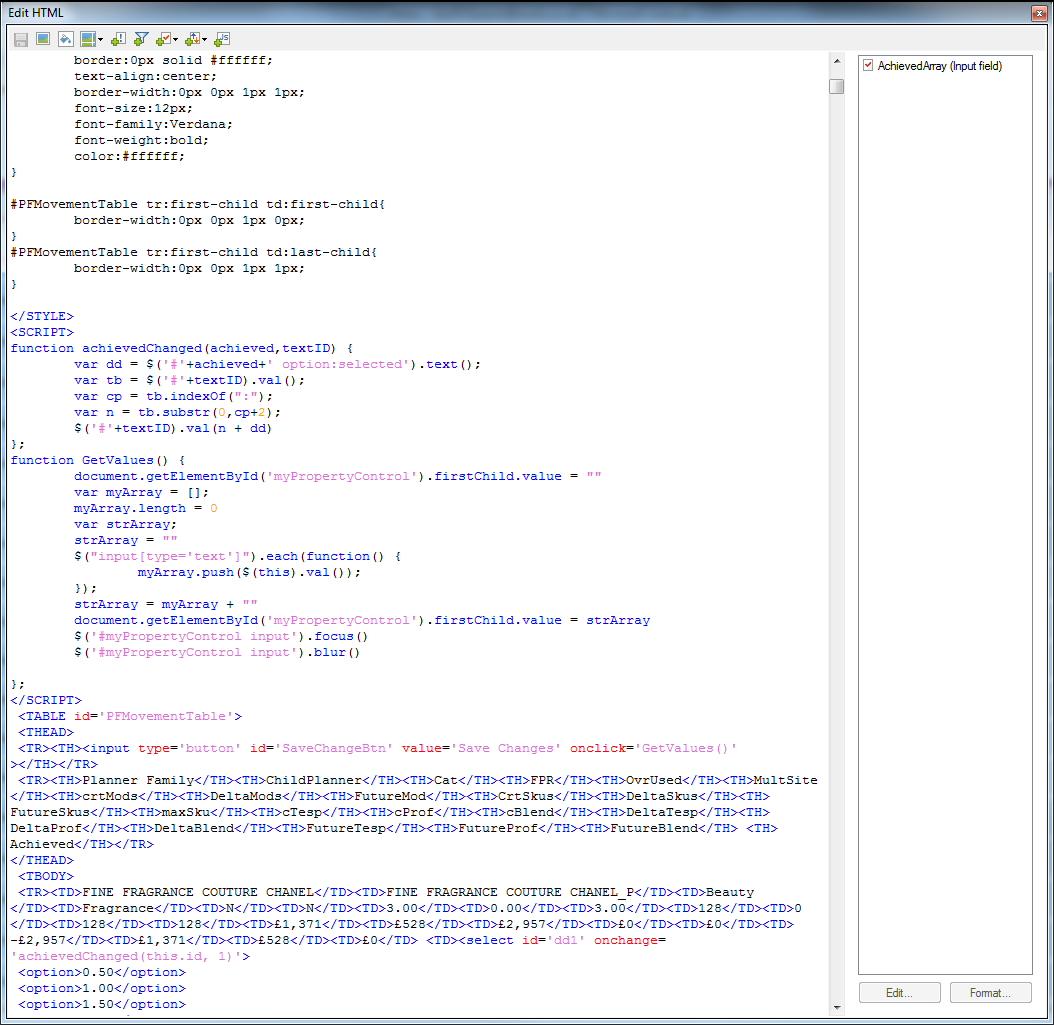
This is a snippet of the HTML generated above. Everything from the "/STYLE" tag up isn't generated dynamically, the dynamic HTML is appended after this, as you can see in the code above.

Friday, 7 June 2013

Queue up BackgroundWorkers OR wait for BackgroundWorker to finish without blocking the UI

This is a new one, so thought I'd put it here.
I have a procedure that uses a BackgroundWorker and updates a log window in my main form. Simple stuff.
I use this procedure for more than one task, incorporating more than one procedure. In the case I solved here, I had to wait for one BackgroundWorker to complete before moving on with the code in the Main Thread. I couldn't trigger it in the RunWorkerComplete event, as the BackgroundWorker was used multiple times throughout the application.
So here it is: (I used ThreadPool and Invoked the actions!)
private void Button1_Click(object sender, EventArgs e)
        {
            ThreadPool.QueueUserWorkItem(delegate
            {
                Invoke(new Action(delegate { ProcedureWithBackgroundWorker(); }));

                while (BW.IsBusy)
                {
                    Thread.Sleep(100);
                }

                Invoke(new Action(delegate { SecondProcedureThatWaitsForTheOneAboveToFinish(); }));
            });
        }

Friday, 24 May 2013

Pivoting data in SQL and SSIS Dynamically

There is a pviot function in SSIS and a pivot query in SQL - both of which I find laborious, ESPECIALLY the one in SSIS!
Here is a dynamic SQL query that will fix the problem:

DECLARE @columns NVARCHAR(2000)
SELECT  @columns = COALESCE(@columns + ',[' + [Column2] + ']', '[' + [Column2] + ']')
FROM    TableName
ORDER BY [Column2]

--print @columns
DECLARE @SqlQuery nvarchar(4000)
set @SqlQuery = 'select [Column1],' + @cols + ' into dbo.NewTable from (select [Column1],[Column2], [Column3] from TableName) p 
   PIVOT (MAX([Column3]) FOR [Column2] in (' + @columns + ') ) AS pvt order by [Column1]'

--print @SqlQuery
execute (@SqlQuery)


I recommend adding this as an 'Execute SQL Task' in your Control Flow - even if it means using a Staging Table. Will Allow for a change in columns and everything!


One more thing! Notice the 'into dbo.NewTable'. You'll need to drop that table before performing this task. This will allow for a change to the dynamic columns. Dynamic column queries such as this are great even if the columns are fixed.
I've just done one where there were 50 columns after the pivot and I don't have time to be defining and writing all that extra code! It is espcially irritating in SQL (before SQL Server 2012 - which I understand takes care of tasks such as this much better!).
Good luck.

Tuesday, 7 May 2013

Create and export Excel in C# Winform application

So I used to do this with something along the lines of:
using System;
using System.Windows.Forms;
using Excel = Microsoft.Office.Interop.Excel;

namespace WindowsApplication1
{
 public partial class Form1 : Form
 { 
    public Form1()
  {
   InitializeComponent();
  }
 private void button1_Click(object sender, EventArgs e)
 {
  Excel.Application excel = new Excel.Application();
  Excel.Workbook wb = new Excel.Workbook();
  excel.Workbook.Add(wb);

etc...etc...etc..


Then I would loop through, adding data to a worksheet. This was very memory intensive and very SLOW....
This is how I do it now.

I create an Excel file using Excel - I add and name worksheets, I format columns etc and get it to 'look' how I want it to.

I then add this to the application in a folder called 'Excel Templates'. You can then change the deployment properties to export and create this file on installation.

The idea is that the application will copy, rename and save this file. It then creates an OLEDB connection and adds rows using an update command (I use update because it keeps the cell formatting and doesn't append after 'blank rows').

This is a basic class for copying and populating the Excel template. The 'FileName' parameter is what and where you want to save the file as.
using System;
using System.Collections.Generic;
using System.Linq;
using System.Text;
using System.Data;
using System.Data.SqlClient;
using System.IO;

namespace SpaceApp_v0._1.Classes
{
    class ExcelClassExample
    {
        static DataSet ds_Excel;

        public void CreateViewer(string FileName)
        {
            string myPath = System.Windows.Forms.Application.StartupPath + @"\Excel Templates\ExcelTemplate.xls";

            File.Copy(myPath, FileName, true);

            Populate_Excel(FileName);
        }

        private void Populate_Excel(string FileName)
        {
            SqlConnection conn = new SqlConnection(ConnectionsClass.Server);

            string sqlQuery = "select FieldNames from TableName Where parameters = 'Value'";

            SqlCommand cmd = new SqlCommand(sqlQuery, conn);

            ds_Excel = new DataSet();

            SqlDataAdapter da = new SqlDataAdapter(cmd);

            conn.Open();

            da.Fill(ds_Excel, "TableName");

            conn.Close();

            string DSN = string.Format("Provider=Microsoft.Jet.OLEDB.4.0;Data Source={0};Extended Properties=\"Excel 8.0;HDR=No;IMEX=2\"", FileName);
            using (System.Data.OleDb.OleDbConnection Con = new System.Data.OleDb.OleDbConnection(DSN))
            {

                Con.Open();

                using (System.Data.OleDb.OleDbCommand Com = new System.Data.OleDb.OleDbCommand())
                {
                    int Row = 1;
                    foreach (DataRow row in ds_Excel.Tables["TableName"].Rows)
                    {
                        Com.Connection = Con;
                        Com.CommandText = string.Format("UPDATE [Sheet1$A" + Row + ":Z" + Row + "] SET F1 = '{0}'", row["Column1"]);

                        Com.ExecuteNonQuery();
                        Row++;
                    }
                }
                Con.Close();
            }
        }

    }
}

You can call this class from your main app using a button click event. I have used this is a background worker, creating 2,500 Excel 'templates' in a short period of time, with progress bar etc.

Tuesday, 26 February 2013

Connect to SSAS outside of a domain!!

I was finally given to a test server to try out my new-fangled Data Cube expertise. Trouble is the company is quite paranoid about security and things going wrong, so it isn't part of the domain. This means I cannot connect to Analysis Services as AS will only allow Windows Authentication.

Never fear - where there's a will there's a way!

I created an application pool using IIS, and connect to that instead!

Here's how to do it!

Go to: C:\Program Files\Microsoft SQL Server\MSSQL.1\OLAP\bin\isapi\ and copy the contents of this folder to: C:\Inetpub\wwwwroot\olap\. You'll need to create the 'olap' folder.

Right-click on 'My Computer' and click on 'Manage'. Click on 'Services and Applications' then 'Internet Information Services' (if you don't have IIS installed you can probably do this from 'Control Panel' - I'm not going to explain it here, just GOOGLE IT!!).

Right-click on 'Application Pools' then 'New' then 'Application Pool...' Set 'Application Pool ID' to 'olap' (can you see where this is going yet?). Ensure 'Use default settings for new application pool' is checked.

Now, open 'Web Sites' folder under 'Application Pools' folder, right-click on 'Default Web Site' and click 'new' then 'Virtual Directory'. Name it as 'OLAP' and point it to the folder you created earlier 'C:\Inetpub\wwwwroot\olap'. In 'Access Permissions' select 'Run scripts (such as ASP)' ONLY.

Right-click on your new 'OLAP' website and click on 'Properties'
Set 'Application pool:' to 'olap'

Click on 'Configuration', then 'Add...'

In the 'Executable' box browse to your virtual directory.

Type '.dll' into the 'Extension' box.

Click 'OK'


In OLAP Properties, click on the 'Directory Security' tab and under 'Authentication and access control' click on 'Edit'.
Enable annonymous access

Enable 'Integrated Windows Authentication' and 'Basic Authentication (password is sent in clear text)'

FINAL SECTION!

Back in 'Computer Management' open 'Services and Applications' then 'Internet Information Services' then right-click on 'Web Service Extension' and 'Add a new Web Service Extension'.

Set 'Extension Name' to 'olap' and add the 'msmdpump.dll' to 'Required files' by browsing to your virtual directory'. Check 'Set extension status to Allowed' and click 'OK'.

That oughta' do it! Now when you connect to SSAS via Management Studio type in 'http://servername/olap/msmdpump.dll' and BINGO! you're iin.
I may add pictures but I'm busy today, besides it's better to struggle and understand than follow blindly and not understand.
Thursday, 7 February 2013

Embed Console Window in Winform Application

This has been bugging me for a while now.

I use TelNet to pass commands to a Unix box.  I wanted to embed the TelNet interface into a Winform application.

I concentrated on embedding a console app within the winform app. WRONG.

I used TelNet libraries and messed around looking to use RichTextBoxes. WRONG.
Well. Probably not that wrong, they mostly worked but weren't very good.

Here is what I have done:

Process TelNet = new Process();

TelNet.StartInfo.FileName = "TelNet.exe";

TelNet.Start();

If you need any more clarification please leave.

This prevents cross-thrreading issues, launching new applications and all sorts of problems.

It works for me.  I know it's simple.  It's all I require.

Wednesday, 9 January 2013

Simplified Modulo in SSIS

OK, last modulo post was rather meandering and overly complex for most people to use. I wrote it mostly for my reference in the future to jog my memory and didn't have the time to go into great detail on how to implement that solution.

Next time I design a large Slowly Changing Dimension I may post it up step by step in greater detail.

With that in mind I thought I'd post a simpler to understand and implement example.

The Algorithm works as follows:

instead of this -
select * from MyLargeTable


Use this query -
select * from MyLargeTable
where (ID %3) = 0
OPTION (MAXDOP 1)


The '3' after the percentage sign dictates how many sections to split the table into and the '= 0' dictates which selection we are selecting. It is a zero-based index.

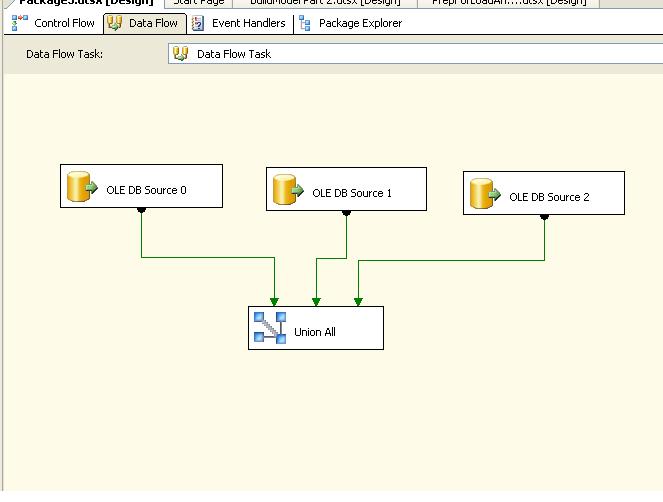
A simple implementation in SSIS looks like this:


Each OLE DB Source contains the same SQL query as before, but each one uses a different part of the zero-based index (the clue is in the name of the OLE DB Source!).

So there we are - a really simple solution I quarantee will GREATLY improve the speed of large SQL imports, and will also improve the performance of a large dimension when implemented in a bit more context than I had time to write.

N.B. The 'OPTION (MAXDOP 1)' part does something with the processes I can't remember, but I think it's related to running asynchronously and improves performance. Look it up.